Showing posts with label Art and Craft. Show all posts

Tuesday, March 21, 2017

Creating A Masterpiece ~ Review

We are currently receiving excellent fine art lessons via the monthly plan from Creating A Masterpiece. Our family has been access to this online program in return for our honest review.


What Is Creating A Masterpiece.

C.A.M is an online subscription based fine arts program, that is suitable for students of all ages. We were provided access to the Monthly Plan option.

The video lessons are presented by the artist herself, in an easy to follow step by step manner.

All the lessons are broken into appropriate levels so that you can easily assess the difficulty of which level would best suit the child.

In all there are six levels, plus an art history section, to choose from. Within each level are several art projects all using a wide variety of mediums.

This is not an arts and crafts or simplistic art projects program. This is a fine arts program designed for school age students. 

How We Have Used The Program.


When we were first given our family access to C.A.M we immediately set out to explore the site. There is a large number of projects for the children to choose from. After a good look around in each level, watching a few video snippets and downloading the printable supply sheets for a couple of the projects, we settled on choosing an introductory level lesson.

 Lessons In Watercolour: Floral Medley

This particular lesson was broken into three step by step videos and it required drying time before moving on to the next step in the video lessons. 

Sharon, the artist, walks the students through every step of the process. At first we tried to keep up with her, only pausing the video when we needed. We quickly realised for us it was better to watch the video all the way through and to then go back and begin the lesson ourselves, referring back to the video when required.

From there we moved on to a lesson using oil pastels.

 Lesson In Oil Pastel: Winter Cabin

This was a longer lesson with four videos in all, which the kids chose to complete over a couple of days.  Each lesson also includes a section with hints and tips to assist you in getting the best out of the video lessons.

My teen decided to tackle one of the lessons with something a little more challenging for him. He does enjoy his art and seems to me to have a natural flair and this program is a good fit for him to be able to work quietly and independently.

 Lesson In Soft Pastel: Country Rooster

As I type he is sitting across from me on the other computer browsing the lessons for his next choice.

What We Didn't Like


There's actually not a lot we didn't like about this program. If I had to pick something it would be that my youngest does not thrive in this type of video based art instruction. This is the third program of a similar nature that we have tried and I have come to realise that for now at least this type of art instruction is not for him. 

He finds it all quite overwhelming, the watching, the doing, the remembering it all and then add in the fact that his piece never looks like the piece in the video and he simply doesn't enjoy it. My eldest two though are fine working with a video based instruction program, so you just need to really know your kids.


What We Did Like


The variety of what was on offer and the depth at which the student can go if they wish. Some of those upper level pieces are really quite involved, so even some of the most accomplished artists will not be bored here.

The fact that this is true art. It is not craft. It is not cookie cutter art either, that you often see in other programs.  

Now that we have settled in to the program I love simply adding 'art' to the list of topics to be completed this week and my eldest two can get themselves online and choose their own project and complete it entirely on their own.

I also really like the variety of mediums on offer in the various lessons:

    Acrylic
    Batik
    Block Printing
    Carving
    Conte' Crayon
    Copper Tooling
    Glass Mosaic
    Gouache
    Ink
    Mixed Media
    Oil Painting
    Oil Pastel
    Pencil/Charcoal
    Sculpture
    Silk Painting
    Soft Pastel
    Watercolor
    Wood Burning


Looking Ahead


We were given access to Creating A Masterpiece for six months, in return for our honest review. It has absolutely found a staple place in our week and it will continue to be used here in our homeschool.

Further Details


I always love a true, 'try before you buy' and you can do this with Creating a Masterpiece, with their free sample project.

To view the various ways to subscribe to the Creating A Masterpiece website visit their subscription page.

Want to know more? Visit their website or follow Creating A Masterpiece on facebook.  



I hope you have found this review helpful. If you would like to see more reviews about this vendor from other crew members simply visit this link. 


Happy Homeschooling,
Kylie

Come on over and join me at
Facebook ~ Pinterest ~ Instagram ~ Google + 


Check Out My ART Pinterest Board!


Crew Disclaimer

Monday, May 9, 2016

Pop Art

Pop Art Lessons For Kids


As part of our co-op group our primary aged kids have been learning all about the Pop Art era, which exploded in the 1950's

Lichtenstein Art Lesson For Kids

The group talked about how Pop Art was often referred to as loud in its design, they looked at and discussed work by Lichtenstein and noted how he used layers to create his pieces.


They then proceeded to create their own Lichtenstein inspired art pieces.

Andy Warhol Art Lesson For Kids

The famous artist Andy Warhol was up next for discussion and inspiration. The group spent time discussing his design principles and his elements of repetition and colour.


The kids chose their own images in repetition to recreate their own Warhol inspired piece.

Keith Haring Art Lessons For Kids

Keith Haring was the next artist in the line up for their fun with Pop art. Some of Keith's work is not for the faint of heart, please be aware of that before you send your child off googling!
 

The kids were intrigued to find out that Keith began as a graffiti artist and that under all of that his main message through all of his pieces is one of love.


My daughter particularly enjoyed this style and went on to emulate several other pieces from Kieth Haring during the week after her art class.

Jasper Johns Art Lesson For Kids

Finally it was time for the artist, Jasper Johns and how he chose to hide numbers within his work. The kids proceeded to create their own piece using words. 

Can you see what word they've used in this one?
.
.
.
.
.
It's 'Explode', kind of tricky to see all of the letter isn't it!

Another fabulous term of art. I love how during these lessons the group also covers art appreciation without them even knowing it.

Have you looked more closely at the Pop Art era with your children?

Want more art ideas? I have over 200 ideas saved on my art pinterest board. Check it out!


Happy Homeschooling,
Kylie

Come on over and join me at

Facebook ~ Pinterest ~ Instagram ~ Google + 


Have you looked at my Pinterest Boards lately?


Visit Our Worldwide Classroom's profile on Pinterest.


Saturday, April 30, 2016

France ~ Jacques Cousteau


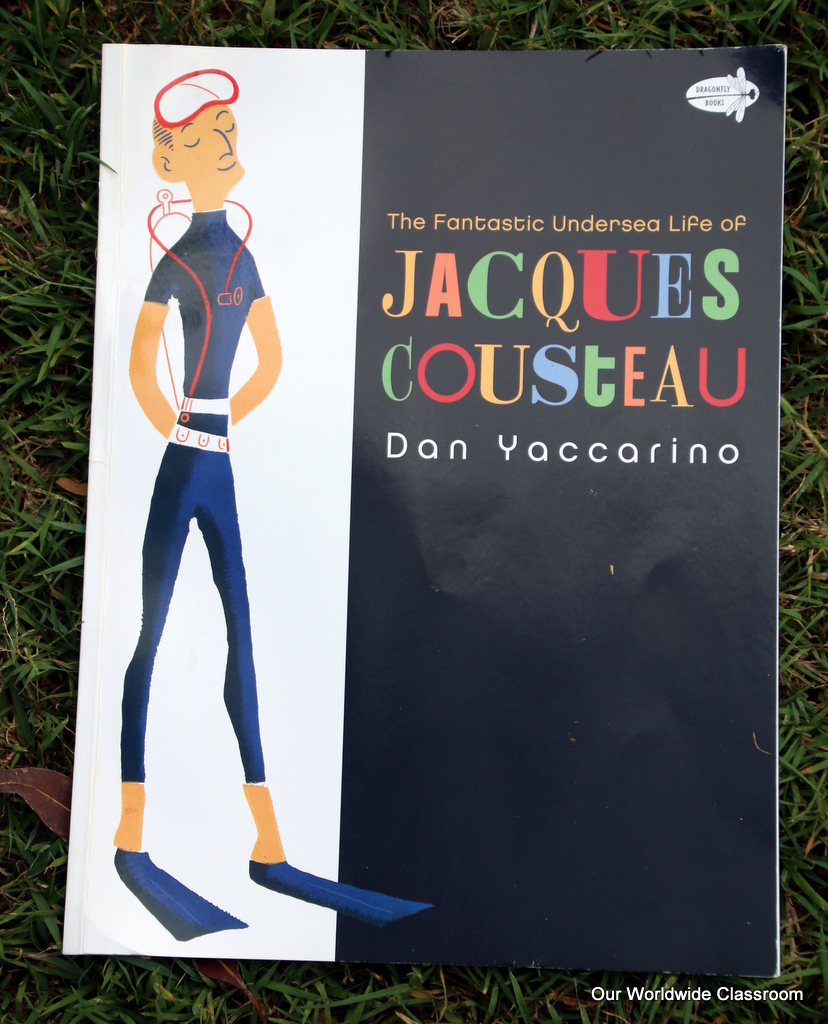
As part of our French unit we spent a brief amount of time looking more closely at the very famous French Scientist and Conservationist Jacques Cousteau.  What an interesting man!

We began simply by chatting about him as  I wanted to find out what knowledge the kids already had.  Which as it turned out was very little. I grew up watching Cousteau so for me that was a little sad to see.


I played this brief video clip to give everyone a broad over view of his life and a glimpse at some of his accomplishments and then it was time for the picture book component.

This part of our France unit was created for the primary aged children in the group so I hunted a picture book to use as our spine.


I chose this particular book because of the simple flow of text. I only had one hour and I knew I wanted to include some art work, I needed a book that would get across what I wanted but that didn't take an exorbitant amount of time to read.

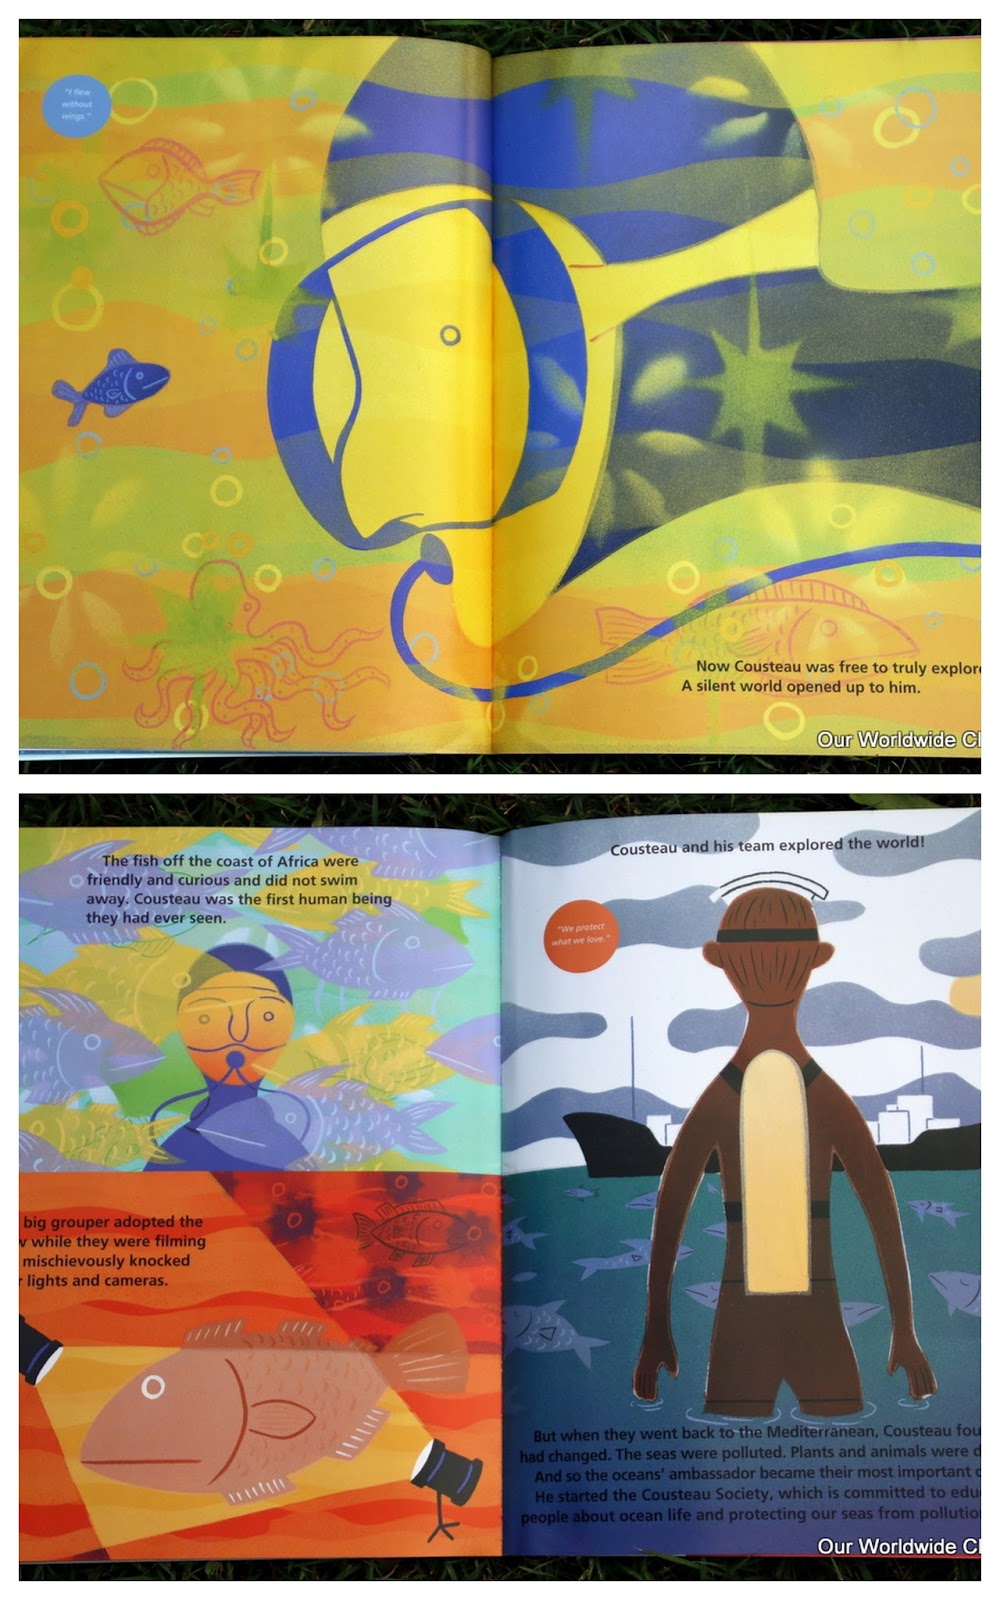
My other reason for choosing this particular book, were the stunning illustrations. They are pieces of art themselves. In fact, in the end these are what I used as our inspiration for our art activity.


Whilst there were a few steps involved in creating these each step is a simple process. If you have the time I'd probably recommend you complete these over a couple of days though. It was quite a big job to tackle all of this in one block of time.


I made sure to purchase the heavier weighted water colour paper in A3. I knew we would be using plenty of very wet paint and given the general heavy handedness of most young children we needed a thicker paper to ensure it didn't tear during the process.

First up I had the kids draw wavy ocean like lines across their pages in white oil pastel. Yes you can't see them and that is on purpose. I simply told the kids they needed to wait for the surprise.

Next up was to paint the entire page to appear as though it is under the ocean, so we used a combination of blues and greens. All in water colour paints that were heavily watered down as we only needed a muted effect for this. Now their wavy ocean lines will start to show through.

As soon as the page was covered in paint and before it had a chance to dry we sprinkled salt across it. This is a trial and error thing to attempt. The idea is that when the salt combines with the paint and slowly dries it will cause little bursts of colour to appear on the page. This worked better on some pages than on others.

Once it is all completely dry you can simply brush off the excess salt.


Whilst our backgrounds were drying we set about organising our chosen Cousteau divers. To save time I had already traced some of these images from the picture book pages. The kids simply chose the design they preferred and cut out their own versions.

They then set about painting and colouring them as they wished.

Whilst our divers were drying we needed to get to work on some of the smaller finishing pieces. Things like seaweed, fish , shells and all manner of objects that one would find whilst diving.


This part was completely free form and the kids simply played around with their own ideas and drawings.


Once everything was dry and neatly trimmed we glued it all onto the background sheet.

Whilst this was a huge task to try and tackle in a single hour the kids did an awesome job and they turned out way better than I could've imagined.

Be sure to pin this so you can easily find it again later!

PIN THIS NOW!!!


More Cousteau Activities

Ticia over at Adventures in Mommydom used this exact same book but used it to encourage her kids to design an underwater home. Way cool, and it would make a great activity to include in a unit on this fabulous man! 

More France Themed Ideas


Our study of the Eiffel Tower
Our time with Madeline
The Glorious Flight 

Take a look at my France Pinterest Board for even more ideas for your France Unit Study


More Ocean Themed Ideas  


Take a look at my Oceans Pinterest Board for even more ideas for your Ocean Unit Study


Have a blast learning more about Jacques Cousteau and our amazing oceans!

Happy Homeschooling,
Kylie

Come on over and join me at

Facebook ~ Pinterest ~ Instagram ~ Google + 


Have you looked at my Pinterest Boards lately?


Visit Our Worldwide Classroom's profile on Pinterest.


Wednesday, December 2, 2015

Christmas In A Box ~ Week 1 Link Up

Here we are at our first installment for the Christmas Fun link up!

Did you read the introductory post? Have you grabbed the button to share?

Please quickly jump over there now so you are in the know of our plans for Christmas Fun!


Then come back so I can show you the cool Christmas crafts my kids have been creating this week, thanks to Clever diy.


clever diy craft boxes


I've considered purchasing something from Clever DIY since Clever Patch released these all in one crafty boxes.

My kids are all into art and craft, they love everything about the mess, the creating, the doing and the end results. I had kind of figured that they would enjoy something like this.

So I was over the moon when they agreed to send us a box to try.

clever diy craft kits

Well, they loved it! They absolutely loved it! And honestly who wouldn't it. I loved it too.

I've been very lucky over the years to review some great products and this particular one has got to be right up on my list of all time fabulous products.

clever diy craft kits

The kits are so well put together, no trashy bits and bobs in here. Every single thing needed to complete the crafts is found inside the box.

The first thing that came to mind for me was that these would be fabulous to take on holidays. All I need is the compact box with everything thoughtfully housed inside.

We often enjoy undertaking some type of art/craft activity whilst away on holidays and this would make that so much easier to do.

christmas crafts for kids

As you know I have three children and we had one box, but thankfully there are a few different craft items in there to complete. They quickly chose something each and were underway. All I did was fill a bowl with some water.

christmas crafts for kids

My daughter fell in love with this item as soon as she saw it. The kit comes with a full colour brochure showing ideas for completed pieces if the child would like that. I simply left it on the table with everything else, so it was totally up to them how they went about it.

christmas crafts for kids

We still have a couple of not quite finished Christmas crafts but I wanted to get this post up for you all ASAP. That way you have plenty of time for your own box of Christmas Craft goodies to arrive on your doorstep.

christmas crafts for kids

So if I had to choose some kind of constructive criticism the only thing I can come up with is, I would love an extra paint brush and messy mat so that more than one child can create at the same time.

Oh and when is my next box arriving?!!!!!!

Thank you Clever DIY this is a fabulous idea and so well delivered. I am very impressed.

Disclaimer: Our family was given one Christmas Craft box in order to write this review. All opinions expressed are my own.


Visit the Clever DIY website at this link.

Your Turn 

What Christmas fun activities have you had this week?

Be sure to share them in the link up below.

Follow along with Christmas Fun on Instagram with the hashtag #homeschoolchristmasfun

If you are still on the lookout for ideas then be sure to visit my Christmas Pinterest Board, which has 100's of pins and is growing daily.

Follow Our Worldwide Classroom's board Seasonal: Christmas on Pinterest.

Want More Christmas Ideas?


 Add Your Links

I would love for you to link up your Christmas posts, both past and present. All family friendly Christmas posts welcome.

When linking up please choose another link or two to visit and comment on. Please also include the Christmas Fun Button in your blog post and/or your blog sidebar. By linking up you give permission for me to pin your post to my Homeschool Christmas Fun Pinterest Group Board. If you would like to join our group board please let me know, we'd love to you have there.

You also give permission for me to feature your post in future Christmas Fun posts here on Our Worldwide Classroom.

Happy Homeschooling,
Kylie

Tuesday, October 27, 2015

Halloween ~ Crafty Fun!


We've been having all kinds of Halloween inspired fun over the past couple of weeks. The very clever mummas that I work with in our micro school put together an awesome array of crafts for the kids to have a go with.

I'm fairly certain that none of these are anything new and can all be found online via a simple google search but I wanted to gather them all in one place and share some pictures with you all any how.


Halloween luminaries in recycled glass jars with battery operated tea lights. These are as simple as painting a jar with the colours and designs you wish or possibly using tissue paper with clear drying pva glue. The cute mummy is literally bandages and some goggle eyes. Simple, fast and they look so damn cute lighting up the coffee table.


Spooky black egg carton bats!

Simply cut up the egg carton leaving 3 egg holders intact, paint black, add fangs, goggle eyes and a string to hang it from.


The kids had so much fun with these and every single one looked completely different. You may need to hunt google for some skeleton head images but the rest is completely up to your imagination!

Cut up Q-tips and glue in any way you wish your skeleton to look.


Oh these delightful little Rock Monsters, anyone remember these?

Oh my I loved my little rock group like you wouldn't believe and when I saw these I just feel in love all over again. I was definitely 10 again for a few moments and I think I might've talked about my rock group love far too much that day ;-)

These couldn't get much easier, smooth rocks from the craft store, sharpies, decorate to your heats content and then hot glue on to a base board of some description.


This Pop Stick Haunted House craft is probably the most detailed of all the crafts but gee it looks fabulous and the mum that tackled this one did an awesome job as it was quite time consuming and used lots of hot glue...careful of those fingers!


It was a windy afternoon for the kids trying to put together these milk bottle ghosts but they did look rather cool all hanging there in the breeze.

Simply trim the milk bottle in half, draw your faces with a sharpie, attach streamers to the bottom and a piece of string to the top and hang.


Ok so technically not a craft but still a bunch of fun. This is such a great sensory activity, the kids will either love it or they will really dislike it. My younger two can't get enough and the ingredients make it such an easy thing to put together.

This particular slime is Oobleck, you can find the recipe for this all of the net.


I detailed our Halloween Themed Poems the other day if you'd like to check out how to put those together visit this link.


Milk bottle light up monsters are another delightfully simple craft but they do look fabulous all lit up in a dark room. Would be great to decorate a party with.

Simply decorate the front of a milk carton with sharpies and your scary face of your choice. Cut a hole in the back where you can feed through a short piece of battery operated fairy lights and you're done!


I was actually quite surprised how eager the kids were with these toilet roll halloween characters, from mad scientists to dracula and everything in between. All you need is a bunch of paint, some coloured paper, maybe a few other decorative bits and pieces. Lay it all on the table and let the kids go at it!


Of course no Halloween celebration is complete without food. Again the same principle as above, a whole delicious looking banquet of edible decorations were placed on the table, but what everyone did with them was completely up to them.

The more we get into Halloween the more I see why everyone enjoys it so much!

Have you been getting your Halloween on this week?

This post is linked to Expedition Homeschool Halloween Party Link Up

Happy Homeschooling,
Kylie

Monday, February 16, 2015

Portable Art Supply Box

We enjoy our art and crafty activities and have accumulated a nice little supply of various items.

I have noticed over the past few months that our art has progressed, we are no longer in that little kid zone, with all of its delightfully fun messiness!


However, every time we want to draw or work on an art project we have to go hunting for all of the supplies. Most often they are all fairly close to each other but at other times they aren't.

I really wanted to remedy that issue so that art became an enjoyable part of our day, not one where we couldn't find the supplies we needed because they weren't put back where they should've been.


Introducing our new Art Supply Caddy, isn't she grand! I had first gone to find a fisher men's tackle box but after realising that the only ones that would suit what I wanted were going to cost me well over $100 I quickly let go of that idea.

This is actually sold as a sewing supply box and I found it in Lincraft, they have a smaller version and I did spend a bit of time contemplating. Now that it is full I'm so glad I grabbed the bigger one.


This is completely portable, with a handle, it also has three layers with the top able to be used independently from the bottom two.

Down in the bottom, the main deeper area we have our paints, spare oil pastels, chalk pastels and palettes.


On top of that sits a tray, which has a handle for easy lifting in and out. Here we have our paint brushes and pens, glitter pens, gel pens, paint brush markers and various other coloured markers.

As you can see in this image there are also large white pull up handles so we can carry this part of the box around if someone else is using the next layer.


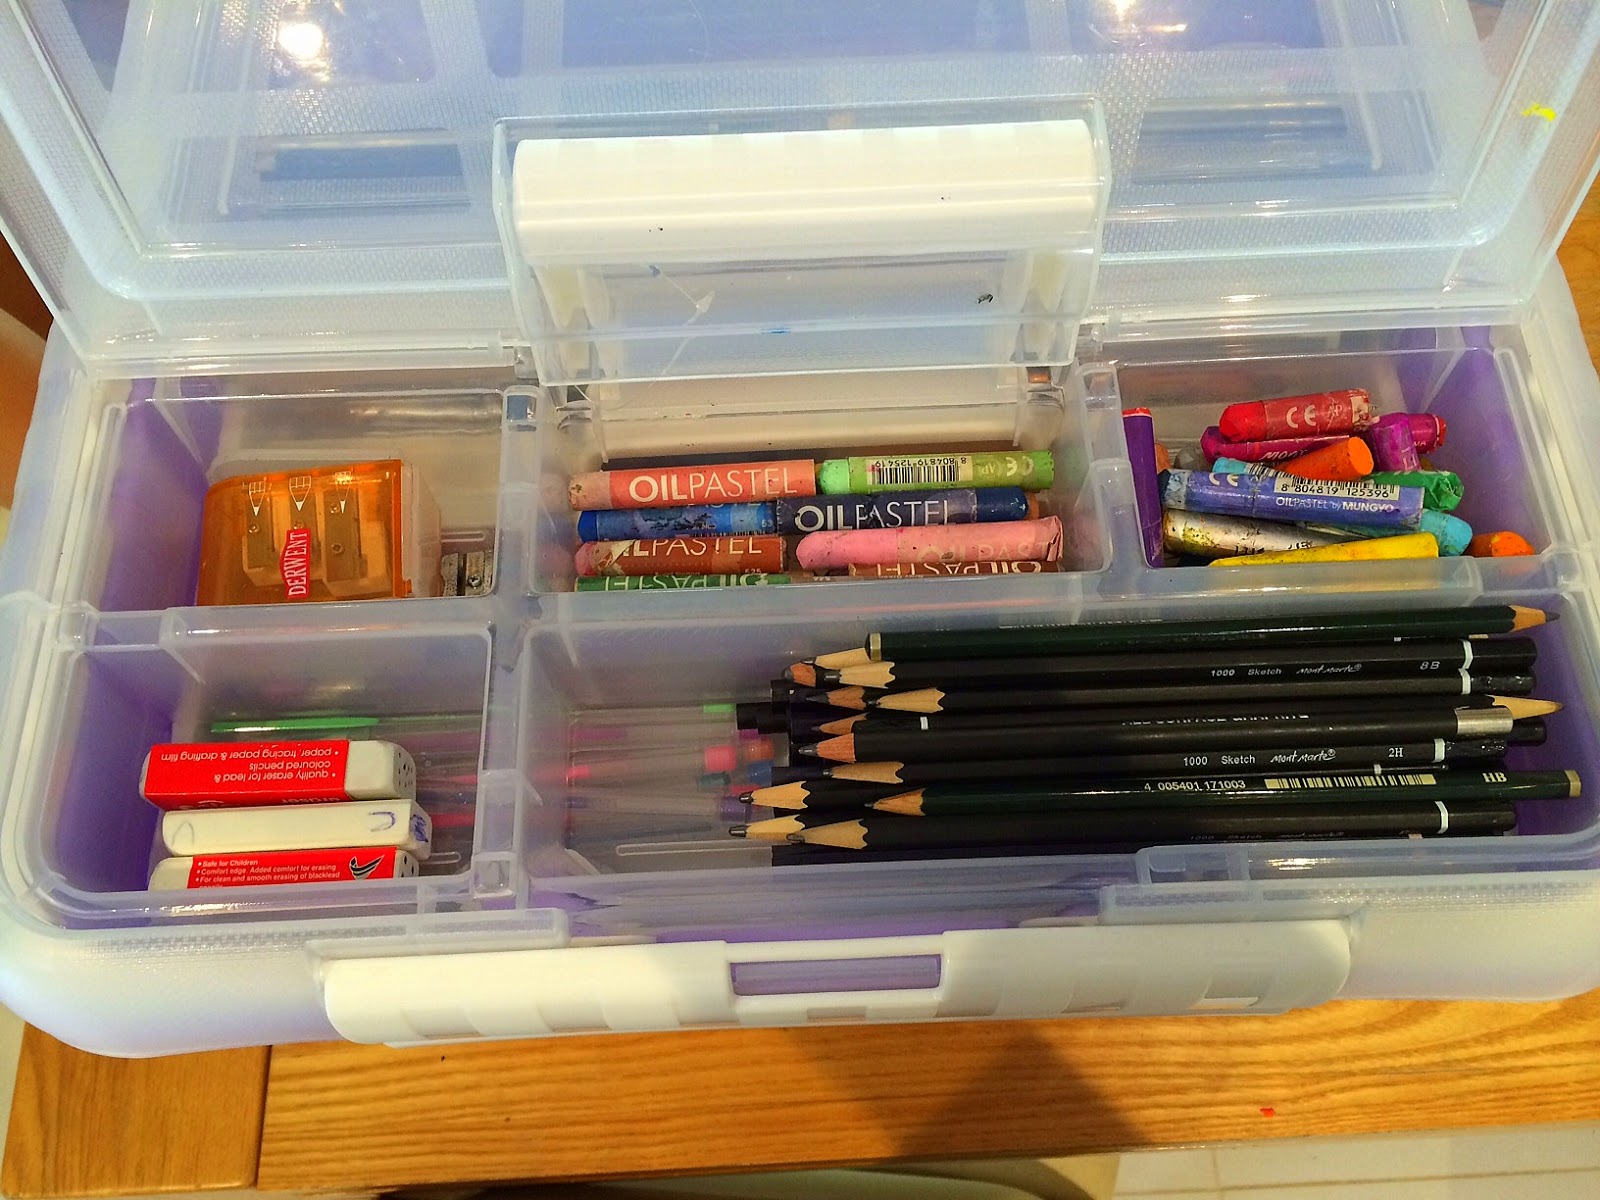
The top of caddy is clear, has carry a handle to pick the entire container up and houses two separate, snap lock sides.  This one we keep pencils, coloured, water colour pencils and our paper stubs. The whole top piece then also snap locks on the caddy itself.


Across on the other side of the top compartment are sketch pencils, charcoal pencils, erasers, sharpeners and our 'in use' oil pastels.

One the best things I love about this tub is that it is so simple to take our art away with us. Whenever we go away, even for just a weekend I always take art supplies, now all I need to do is grab our caddy and visual art diary's and we're off!

Happy Homeschooling
Kylie x

P.S I purchased this item and was not compensated in any way, just sharing something that I love :-)

Related Posts with Thumbnails
 

Blog Design by: Relevant Designs