Showing posts with label Crafts. Show all posts

Wednesday, August 10, 2011

Art Class - Triorama's, A Tutorial


Our home school art group have a current focus on landscapes. This particular week they have worked on Triorama's. A trinagular diorama, aren't they just super cute.

B seems to have a thing for Sydney and in particular the Opera House and Harbour Bridge, he has used these icons in the past for art inspiration.


K, of course created the cutest the little fairy habitat, that I am sure any fairy would be willing to move into.

The kids have been working on various versions of Triorama's since they took this class. It is such a simple concept that they can complete independently from beginning to end. I guess that's why love it and the fact that it is such a flexible activity that will fit into any theme you choose.

I thought I'd show you how to make one. I bet your kids love them too. :-)


To begin you need a sheet of A3 Sketch Pad Paper, the heavier the better,


You need a square, so fold one corner over to the opposite edge, so you have a triangle on the top folded piece, as pictured above.


Cut off the excess rectangular piece that sits along the edge of the triangle.


Open it out and you have a square piece of paper, folded so it is showing two triangles.


You need to see four triangles so fold the large square corner to corner the other way,


So that when it opens you now can clearly see four triangles.
(please read right to the end before going any further with this)


Choose one of those folds (doesn't matter which one) and cut along it, stopping when you get to the centre.


When you have finished cutting, slide those triangles over each other, this will become the 
base of the Triorama.


Those two triangles need to be glued together, to form the base. Use enough glue to hold them but not too much or the bottom will buckle. As you can see has happened in the Fairy Triorama above.


And that's it. Simple.

However be sure to stop prior to cutting and plan your Triorama's layout. You will need draw/colour/paint your background first. Once the background is complete you can then move ahead with the assembly of the triorama. 

When creating the little 3D pieces, such as the Sydney Opera House or the Toadstool, leave a flap across the bottom of the piece when cutting it out. Fold that flap backwards and glue it to the triorama so that it 'pops' out.

Idea's for these are endless. Glue four back to back together to create a scence or a mobile. B thought he could continue with his Australiana theme. It could work well with seasons, one triorama for each, or anything you can come up with really.

Have fun!

Wednesday, May 11, 2011

Bambino Academy - Flower Window Clings

: : : Simple Ideas For Your Bambino : : :

~ C is 33 Months ~


We actually made these for Mother's Day, but got to enjoy them hanging in our window for a day. They looked so pretty, we all had to think twice about giving them away.

The kids are now eagerly anticipating a fresh batch of flowers in the garden so they can do this again. Although the pickings will be slim, since we are coming into winter here.

This is really just another take on the simple clear contact window sun catcher.

I drew a flower shape free hand and cut out the centre, using a bowl for a guide.

I then cut 2 pieces of clear sticky back contact slightly larger than the inside circle.

We spent 30 or so minutes out in the garden (which really is half the fun) gathering the supplies.

C and K worked independently on this one and I simply applied the top layer of clear contact once they had finished. Oh and I also attached the ribbon so they could easily be hung.

In all honesty the photo doesn't do them justice, they really looked great on the window and will be a fabulous spring time craft to do when the garden is flourishing.

This post is linked at ABC and 123 Show and Tell

Friday, April 15, 2011

Easter Egg Garland


When I saw this egg garland  I knew it was something that we could quickly and easily recreate. And it was so very simple. A few pieces of recycled card, tin foil and some paint.

We didn't have cotton buds, must add that to my list when restocking the craft supplies, so we just used a rolled up cotton swab.

All three children handled this one easily, with the older two doing their own tin foil wrapping of the eggs. B is just coming into the age where cutesy little themed crafts just don't inspire him so much anymore,  :( that's when it hits me that my baby is really growing up. Never the less he completed a few eggs anyway, cause he's nice like that ;-) K on the other hand could happily get down and crafty all day long!


Now we just need to continue adding to our Easter wall to brighten it up some. We have a couple more things waiting to be hung so they will help. :-)

Don't forget to add your Easter Fun to the Arty Crafty Party link here.

Monday, November 30, 2009

Christmas Fun 2009: Foam Trees and Other Fun

"Welcome to Week 2 of our Christmas Fun 2009 Linky. I can't wait to see all of the fun Christmas things everyone gets up to over the coming weeks. To join in with the linky just link here to this post from your Christmas Fun Blog Post and don't forget to come back and add your link into the McLinky field at the bottom of this post.

Although not required, but it would be nice to see around the place, is the code for the Christmas Fun Button over there in the right side bar."


We didn't actually get in as much crafting this week as I would have liked but we were busy with other things. I guess there's still plenty of time left before Christmas isn't there!

The crafting highlight was definitely these,


Yet again another super simple craft that looks fabulous when finished, Craft Foam Christmas Trees.

Materials:

Craft Foam
Paper (to make template)
Cardboard Rolls
Glitter Glue
Christmas Sparkles/Decorations
Glue/Tape


I just grabbed a piece of white paper and cut it to the size of my craft foam and then hand drew a Christmas Tree on it. I traced around that template onto the craft foam and cut it out so they were ready to decorate for the kids.


The decoration supplies were pretty simple as well, glitter glue in Christmas colours and some sparkle of some description.


And they were off, decorating to their hearts content. Adding a star here, an angel there and a candy cane here.


Once they were all done I just used masking tape to adhere them to a cardboard roll, you could also use glue. Or why not hang them from a garland!


This miniature forest of Christmas Trees looks great on our Christmas display table.


K did this Dot Marker Santa page. This is her first time using dot markers (I know very sad) and she had a ball. I got the page from Making Learning Fun.

I found these "Search For A Santa" activity pages in a book store a couple of weeks ago. Kinda like a Where's Wally type thing but the one page can be used twice, first by the younger kids (pre readers/early readers) and then by the older kids. Brilliant, now that's value for money!

Across the top of the page it has the pictures (with words) of what needs to be found and then down the side it has a long check list of items.


This one has grand plans but I am not sure if it will actually take shape. The kids are pin punching out each letter of MERRY CHRISTMAS, they will then decorate them with sparkles and hang them on a garland. It is a big job though, that pin punching (embossing tool punching in our case hehehe) takes a while so I'm not sure if this one will beat them. Maybe I've printed the letters too large?

We got an area in the dining/family room ready for our Christmas display table, added our Wreaths from last week, our Christmas Trees from this week and set up our Nativity. It's still looking a little bare so we need to get in some good fun crafting this week.


The highlight of or week hands down was K's Nativity Concert at kindy. She's quite shy so we really weren't sure how she would cope with this but she did a wonderful job. It took her a while to smile up on stage but she got the hang of it and thoroughly enjoyed her time in the spotlight.


She's even saying she would like to do some more things on the stage now!

Christmas is quickly approaching, there's always so much to do. Time to check my supplies box for what fun things we'll create this week. We gathered some pine cones from Nan's during the week and are hoping to find some gumnuts at Grandma's so we can also create with nature.


What kinds of Christmas Fun did you have this week?

Monday, November 23, 2009

Christmas Fun 2009: Wreaths and Glitter Decorations


"Welcome to Week 1 of our Christmas Fun 2009 Linky. I can't wait to see all of the fun Christmas things everyone gets up to over the coming weeks. To join in with the linky just link here to this post from your Christmas Fun Blog Post and don't forget to come back and add your link into the McLinky field at the bottom of this post.

Although not required, but it would be nice to see around the place, is the code for the Christmas Fun Button over there in the right side bar."

Our first week of Christmas crafting, the kids (especially K) were so excited. We've started somewhat earlier this year than we normally would, simply because we are heading away on holidays for the full week before Christmas.

We spent quite a bit of time this week singing carols, listening to different versions on You Tube and trying to decide on one to learn first. Let's just say that is going to be one huge task. B wants no part of memorising a carol unless it is Frosty The Snowman and K only wants to do it when she feels like it. Which this week has been once!

I tried to start off with a few short Christmas rhymes and we nearly had one down pat:

Ring ring ring the bells
Ring them loud and clear
Tell the people everywhere
That Christmas time is here

But just as we were in the home stretch of memorisation K decided that she didn't want to do it anymore.


Any tips on ways to encourage this? I've been wandering around the house singing carols and saying a couple of the rhymes, we have spent most afternoons singing carols whilst we play outside, so maybe the subtle way is the best way to do this. I do keep hoping that someone will join in on the chorus....I guess I can keep hoping hehehe


We started the week with Christmas rubbing plates. I didn't get a photo but B actually chose one that was a frame, after he completed the rubbing he went back over it with a felt tip marker and drew a snow (with elves) scence inside the framed area. A nice little extension to a very simple activity.


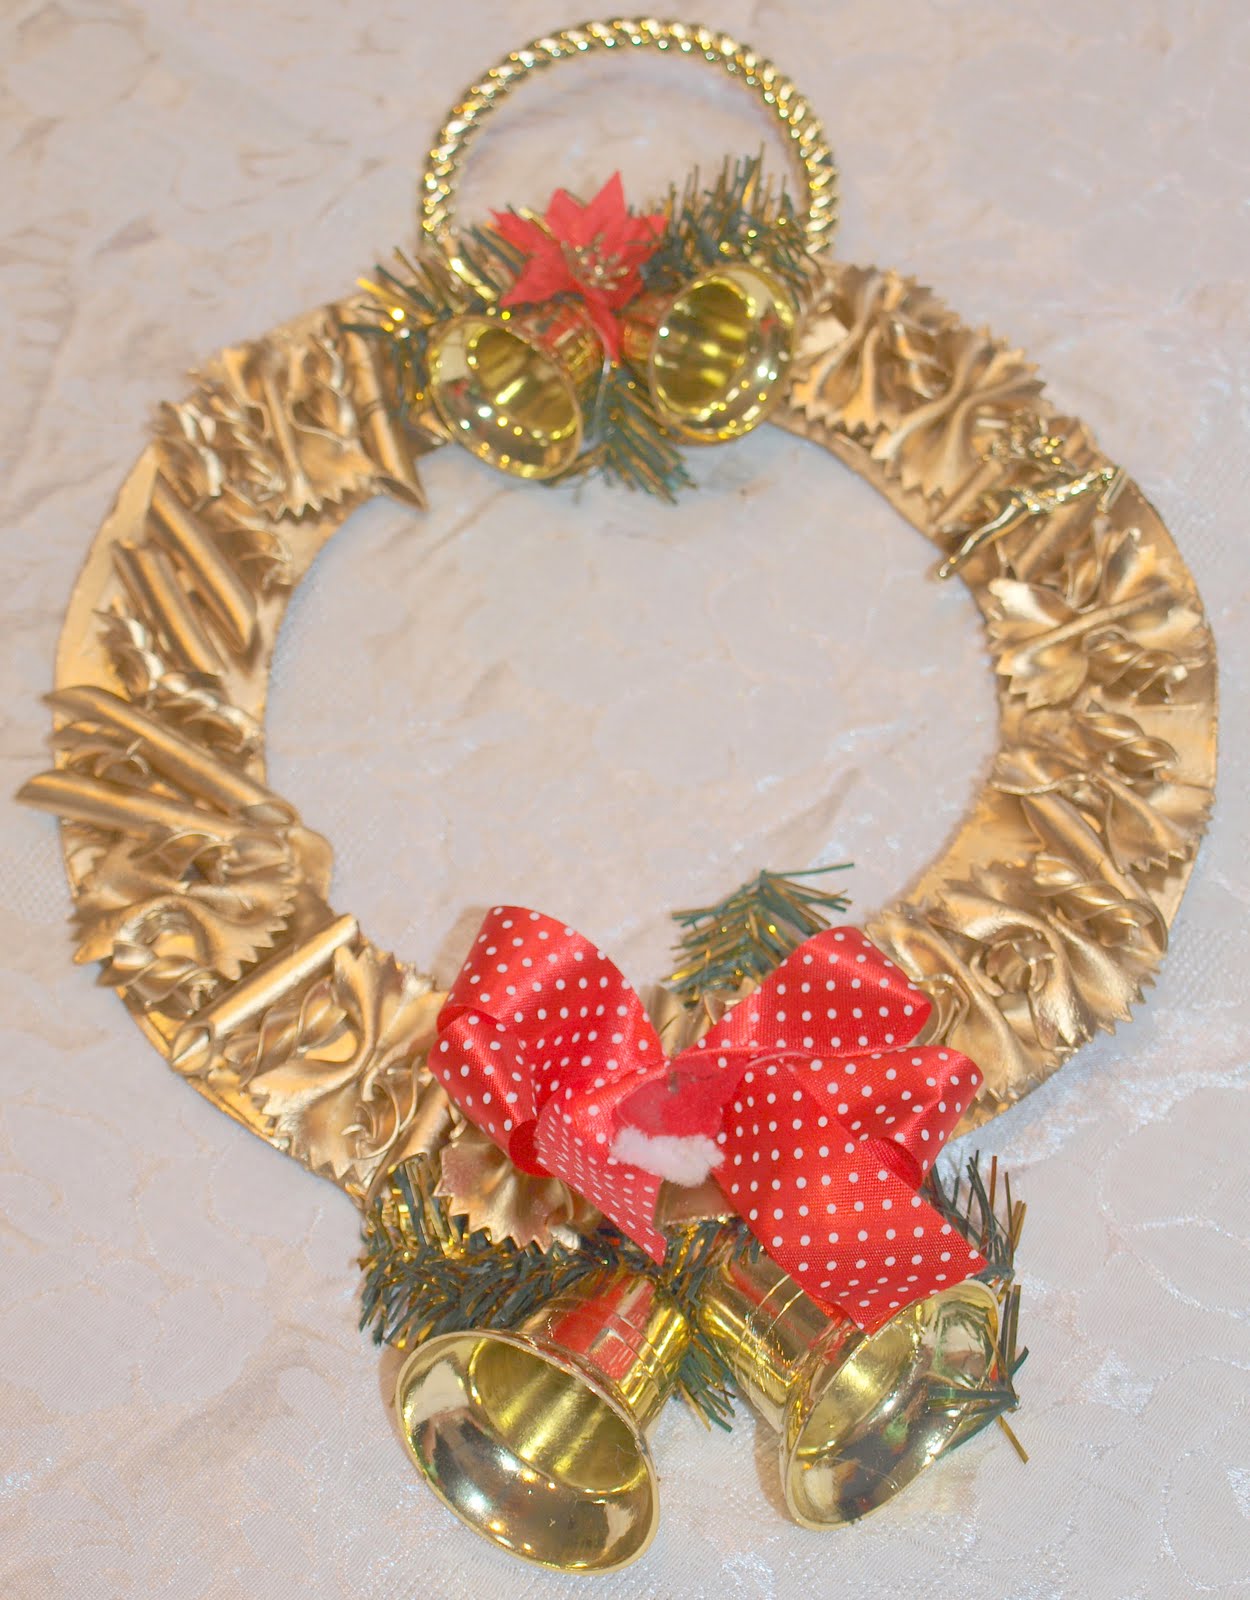
Then we moved on to creating Christmas Wreaths.


Materials:

Used Cereal Boxes
Pencil
Plates, Bowls for tracing around
PVA Glue
Pasta Shapes
Spray Paint (christmas colours)
Old Decorations
Hot Glue Gun (handy but not essential)

For this I used old cereal boxes. The cardboard is a little flimsy though and I was concerned that it wouldn't take the weight, so I stapled two pieces together. If you do this one, I'd even recommend stapling 3 pieces just to make it extra strong.

I used a plate and bowl to draw the template on and set about cutting all of the pieces.


I layed out a few different containers of pasta shapes to choose from. Bows, Penne and Spirals. The kids set about gluing the shapes on in any design they chose. I just suggested that they cover as much of the cardboard ring as possible.


The wreaths were left to dry over night. Whilst we went to the hardware to purchase our cans of spray paint. We chose gold and silver.


The next day we took the wreaths outside to spray. Both B and K chose to use the gold paint. This part was priceless, truly it was. You know when you purchase a can of spray paint the lid is generally the colour of the paint. In this instance the gold and silver were pretty bland looking and I knew that they weren't that impressed with the colours.

As soon as the first spray of paint hit their wreaths you could see the smiles and their eyes light up. They really just could not believe how incredibly shiny it was. Such a simple experience but it was one that we'll remember and talk about for awhile to come.


B finishing off with the spray can. K found the nozzle a little tricky to use. They only took about 10 minutes to dry outside and already they looked fabulous. Whilst they were drying we went in to go through the stash of old decoarations. The kids found the pieces they wanted to use to adorn their wreaths.

We attached everything with a hot glue gun. One important point here, you really do get what you pay for when it comes to these things. I bought ours on clearance for next to nothing and it is a piece of rubbish.


This is B's finised Wreath


And K's finished Wreath. We have already had comments from family members that have seen them as to how lovely they are and did the kids really make these?! These were oh so simple and they truly look stunning.

Next it was time for some very Glittery Tree Decorations (these were a kit but you could easily do this yourself)

Materials

Cardboard cut into Christmas Shapes
Glue
Glitter
Other Christmas items to decorate


The kit included Trees, Presents, Stars, Snowflakes and Rudolph.


A splattering of things to decorate with will definitely help. Be prepared for glitter everywhere and I mean everywhere.


Add some glue and start decorating.


Leave to dry overnight.


The finished decorations waiting to be hung on the tree. They just need a piece of string or something tied to the top for hanging purposes.


K enjoyed these structured crafts but letting her loose on the supplies is oh so much fun. This is where she is really in her element. She created this collage from left over (old) decorations and glitter.

Well we had a great first week of Christmas Craft. I'm trying to not do too much all at once for fear of the kids losing interest and for us running out of supplies......now what shall we make this week????? Time to go back through the box.


What Christmas Fun did you get up to this week?

Related Posts with Thumbnails
 

Blog Design by: Relevant Designs