Showing posts with label Christmas Fun 2009. Show all posts

Thursday, December 6, 2012

Free Printable: Christmas Vocabulary Cards

Wow, can't believe I created these 3 years ago now. Thought I'd repost for any newer readers that may not have seen some of my Christmas activities.

My first set of Montessori Printables for you!

I am actually very excited about these, yeah I know it doesn't take much to excite me. I really enjoyed putting them together and I did get a little buzz when they were placed on the shelf for the kids to use.

They really didn't look out of place right alongside the professionally made items.....pretty chuffed I was hehehe

Anyway enough of that.

As promised in my first Christmas Fun Post, this is a set of 16 Montessori 3 Part Cards for Christmas.

The file includes 16 cards with labels, 16 picture cards and 16 labels.


They depict the following images:

Bell
Wreath
Candle
Gift
Pudding
Santa
Decoration
Stocking
Tree
Lights
Star
Bon Bon
Nativity
Mince Pies
Reindeer
Candy Cane

Even if you do not use Montessori these cards are suitable for anyone to implement into their Christmas Activities. You can also easily leave out an cards that may be unsuitable for your family. We found that 16 was alot of cards to work with in one sitting so have split ours into 2 separate groups.

I'll be posting some photo's of my kids using them in my next Christmas Fun Post early next week.

I hope you enjoy using these cards as much as I enjoyed making them. If you do print them off and use them I'd love to hear from you or see them in a blog post somewhere. Please leave a comment letting me know and feel free to include a link to your blog post.

Download the 3 Part Christmas Cards here.


Monday, December 21, 2009

Wednesday, December 9, 2009

Free Printable: Christmas Patterning

My latest printable is for the younger ones amongst us.

Christmas Patterning!

This was way more time consuming than I had originally anticipated. I did have plans to have the page you see here, plus a page of religious symbols and one of more generic Christmas symbols. All of that resizing and cutting and pasting got the better of me so I only have the one sheet. Plus plenty of small graphics to use with the patterning sheets. Maybe next year I'll come back and add a page or two to the document.

For now I hope you can still put this too good use. I will be printing, cutting my strips into seperate pieces and laminating mine. You could however just glue the pieces straight onto the strips.

Please let me know what you think!

Download this file here.


Monday, December 7, 2009

Christmas Fun 2009: Snowmen, Cooking, Trees & More

Welcome to Week 3 of our Christmas Fun 2009 Linky. I can't wait to see all of the fun Christmas things everyone gets up to over the coming weeks. To join in with the linky just link here to this post from your Christmas Fun Blog Post and don't forget to come back and add your link into the McLinky field at the bottom of this post.

Although not required, but it would be nice to see around the place, is the code for the Christmas Fun Button over there in the right side bar."

We took a drive into the city this past week to view the gigantic Christmas Tree they display every year. This was the first year we've seen it so the kids couldn't believe their eyes. We hope to make this part of our annual Christmas Traditions.


Not such a great photo but a family shot none the less. :)


We also strolled up the mall to have a peek at the Christmas window displays that Myer (department store) puts up every year.


This year the theme was, Olivia Helps With Christmas.


We knew that that large tree would truly come to life after dark so everyone was pretty eager to see it. This photo does nothing to show how magical it looked, but it was stunning, completely lit up and solar powered too!!


Thought it was about time we started some Christmas Cooking. We try to start with something super easy and super yummy as it always gets the kids extra excited to try the other recipes out.

First up a simple sugar cookie recipe.

Ingredients

* 1 1/2 cups butter, softened
* 2 cups white sugar
* 4 eggs
* 1 teaspoon vanilla extract
* 5 cups all-purpose flour
* 2 teaspoons baking powder
* 1 teaspoon salt

Directions

1. In a large bowl, cream together butter and sugar until smooth. Beat in eggs and vanilla. Stir in the flour, baking powder, and salt. Cover, and chill dough for at least one hour (or overnight).
2. Preheat oven to 400 degrees F (200 degrees C). Roll out dough on floured surface 1/4 to 1/2 inch thick. Cut into shapes with any cookie cutter. Place cookies 1 inch apart on ungreased cookie sheets.
3. Bake 6 to 8 minutes in preheated oven. Cool completely. This recipe thanks to All Recipes

We decorated them with a simple icing sugar mixture and some sprinkles.

The blue bowl was the wrong colour choice for a photo, ah well, not going to move them just to get a better shot hehehe.


I've opted out of putting up our extra large tree this year. With a 16 month old baby in the house I just didn't feel that it was worth the stress. I don't believe in not allowing little ones to touch and feel things and obviously the tree and all of its decorations would have been off limits.

Not to mention that I had many a flashing before my eyes of the tree ending up on top of C with him caught underneath that I just felt it was safer, kinder and easier to go without this year.

We have the small advent tree that we will start adding decorations too once some of the gift bags are removed.

K and I decided we would make our own backyard, stick tree. Ok this isn't definitely for everyone, but I really like it. We are lucky enough to live on a decent sized piece of land that has lots of gum trees, so finding a 'stick' that was suitable took no time at all. We shredded the dead leaves and gave it a spray of silver paint.

Popped it in a pot of sand and rocks and it is now on display on our Christmas table. There's still lots of room on it too continue to add the kids homemade decorations, which really are so much nicer than the store bought ones anyway, don't you think?!


K made this sweet little decoration at kindy this week too. A coloured picture of baby Jesus and craft sticks glued together, sweet and simple.


I keep forgetting to share some of our books too but I've included a couple this time around.

Rocking Horse Christmas by Mary Pope Osborne, is the touching story of a rocking horse and how he is passed from one generation to the next.


Dashing Through The Sand is a funny look at Santa's travels around Australia.


The following recipe is from a freebie supermarket magazine.

White Christmas Crackles

2 cups Rice Bubbles
50g butter
1 cup white marshmallows
30g white chocolate melts, melted (I think you need a little more than 30g)
20 jaffas (we used christmas m & m's)
mini patty cases


Method

Place rice bubbles in a large bowl. Combine butter and marshmallows in a small saucepan and melt over low heat until smooth. Pour onto rice bubbles and stir to combine.

Spoon mixture into mini patty cases and leave to set for about 20 minutes.

Spoon white chocolate over the crackles and place a Jaffa on top of each one. Leave to set.


I saw this idea here and thought it was very cute and another relatively indpendent craft (do you get the feeling I like those type, I can set them up and off they go)


For this though we used Craft Foam Sheets that I cut into strips. The kids first painted a wash on a piece of A4 white card and then set about laying down the pieces of the tree. I gave them some glitter glue (other sparkles which they chose not to use) and the off cuts (thinking they could possibly add gifts under the tree).

I am so impressed with how these turned out they look great on the wall in our Christmas Display area. Can you see the little face on K's tree trunk? She went a bit wild with her glue but that's what you get for leaving a 5 year old that loves glitter working freely on her own!


Every year the kids Grandma makes them a Advent Calendar (aren't they lucky). For the first years she made a new and different one each time but over the last couple of years has settled on a simpler reuseable design.

It is simply circles of fabric, with a little trinket or chocolate inside (she had to fit 3 in each this year) tied with ribbon and a cardboard circular number for the countdown.


This year K added all of the bags to the tree herself. (with a little of my help) Every year whoever is awake first sits very impatiently waiting for the other to get up so they can open the next one on the tree. It only took C 3 mornings to work out that he got something inside those things and he was also right there beside them waiting for his little goodie too!


The kids had another Art Class this week with our Home School Network. We asked for a Christmas feel this time.

Snowmen and Perspective

Oil Pastels
A3 Sketch Paper
Acrylics

Step 1: Start by folding the sheet of paper 5 times horizontally. The top section is for the Snowman's Hat, then as you move down the paper you add a circle of sorts for each part of his body, making them larger as you go. The last (bottom) section is for the land (grass, snow whatever you choose).

Be sure to make your snowman quite big and have him going off the edge of the page a little, you want him to be right there with you once you're done.

Younger artists may need the help of a template to trace around for this step.

Step 2: Using a sponge add the background colour, making sure not to cover over your snowman.


Step 3: Using either the back of your paint brush or a Q Tip add dots of white acrylic for falling snow.


Step 4: Then it's time to decorate and complete your snowman. Add lots of vibrant colours for his hat out of Oil Pastels. Maybe some buttons and an extra special nose.

Step 5: Optional but does look really cute. A Christmas Tree added to the horizon line far off in the distance.


You can either add green oil pastel/paint for grass or leave the bottom section white for snow.


The kids loved how these turned out and so do I.

These art classes have been so much and I love that in the one class we have children between the ages of 5 and 13, all working on the same project all very different results. We are really looking forward to more art classes next year.

What Christmas Fun have you been up to this week?


Wednesday, December 2, 2009

Free Printable: Christmas Number Sequencing

Here's my latest free printable, 2 sets of Christmas themed number sequencing cards.

There are 2 different designs and both sets go up to 20, just print, cut and laminate, simple.

Go here to print a copy.

Monday, November 30, 2009

Christmas Fun 2009: Foam Trees and Other Fun

"Welcome to Week 2 of our Christmas Fun 2009 Linky. I can't wait to see all of the fun Christmas things everyone gets up to over the coming weeks. To join in with the linky just link here to this post from your Christmas Fun Blog Post and don't forget to come back and add your link into the McLinky field at the bottom of this post.

Although not required, but it would be nice to see around the place, is the code for the Christmas Fun Button over there in the right side bar."


We didn't actually get in as much crafting this week as I would have liked but we were busy with other things. I guess there's still plenty of time left before Christmas isn't there!

The crafting highlight was definitely these,


Yet again another super simple craft that looks fabulous when finished, Craft Foam Christmas Trees.

Materials:

Craft Foam
Paper (to make template)
Cardboard Rolls
Glitter Glue
Christmas Sparkles/Decorations
Glue/Tape


I just grabbed a piece of white paper and cut it to the size of my craft foam and then hand drew a Christmas Tree on it. I traced around that template onto the craft foam and cut it out so they were ready to decorate for the kids.


The decoration supplies were pretty simple as well, glitter glue in Christmas colours and some sparkle of some description.


And they were off, decorating to their hearts content. Adding a star here, an angel there and a candy cane here.


Once they were all done I just used masking tape to adhere them to a cardboard roll, you could also use glue. Or why not hang them from a garland!


This miniature forest of Christmas Trees looks great on our Christmas display table.


K did this Dot Marker Santa page. This is her first time using dot markers (I know very sad) and she had a ball. I got the page from Making Learning Fun.

I found these "Search For A Santa" activity pages in a book store a couple of weeks ago. Kinda like a Where's Wally type thing but the one page can be used twice, first by the younger kids (pre readers/early readers) and then by the older kids. Brilliant, now that's value for money!

Across the top of the page it has the pictures (with words) of what needs to be found and then down the side it has a long check list of items.


This one has grand plans but I am not sure if it will actually take shape. The kids are pin punching out each letter of MERRY CHRISTMAS, they will then decorate them with sparkles and hang them on a garland. It is a big job though, that pin punching (embossing tool punching in our case hehehe) takes a while so I'm not sure if this one will beat them. Maybe I've printed the letters too large?

We got an area in the dining/family room ready for our Christmas display table, added our Wreaths from last week, our Christmas Trees from this week and set up our Nativity. It's still looking a little bare so we need to get in some good fun crafting this week.


The highlight of or week hands down was K's Nativity Concert at kindy. She's quite shy so we really weren't sure how she would cope with this but she did a wonderful job. It took her a while to smile up on stage but she got the hang of it and thoroughly enjoyed her time in the spotlight.


She's even saying she would like to do some more things on the stage now!

Christmas is quickly approaching, there's always so much to do. Time to check my supplies box for what fun things we'll create this week. We gathered some pine cones from Nan's during the week and are hoping to find some gumnuts at Grandma's so we can also create with nature.


What kinds of Christmas Fun did you have this week?

Thursday, November 26, 2009

Free Printable: Letter To Santa Paper


Do your kids write letters to Santa every year?

Then hopefully they'll like some fun Christmas paper to write their letters on.

This file includes 2 different designs of writing paper and it meets 3 different levels of writing ability.

There's a full sheet of lined paper, one with half lines and a half blank page to draw Santa a picture and the other completely blank for just drawing, perfectly suited to all those little pre writers out there.

To download the file go click here.

Monday, November 23, 2009

Christmas Fun 2009: Wreaths and Glitter Decorations


"Welcome to Week 1 of our Christmas Fun 2009 Linky. I can't wait to see all of the fun Christmas things everyone gets up to over the coming weeks. To join in with the linky just link here to this post from your Christmas Fun Blog Post and don't forget to come back and add your link into the McLinky field at the bottom of this post.

Although not required, but it would be nice to see around the place, is the code for the Christmas Fun Button over there in the right side bar."

Our first week of Christmas crafting, the kids (especially K) were so excited. We've started somewhat earlier this year than we normally would, simply because we are heading away on holidays for the full week before Christmas.

We spent quite a bit of time this week singing carols, listening to different versions on You Tube and trying to decide on one to learn first. Let's just say that is going to be one huge task. B wants no part of memorising a carol unless it is Frosty The Snowman and K only wants to do it when she feels like it. Which this week has been once!

I tried to start off with a few short Christmas rhymes and we nearly had one down pat:

Ring ring ring the bells
Ring them loud and clear
Tell the people everywhere
That Christmas time is here

But just as we were in the home stretch of memorisation K decided that she didn't want to do it anymore.


Any tips on ways to encourage this? I've been wandering around the house singing carols and saying a couple of the rhymes, we have spent most afternoons singing carols whilst we play outside, so maybe the subtle way is the best way to do this. I do keep hoping that someone will join in on the chorus....I guess I can keep hoping hehehe


We started the week with Christmas rubbing plates. I didn't get a photo but B actually chose one that was a frame, after he completed the rubbing he went back over it with a felt tip marker and drew a snow (with elves) scence inside the framed area. A nice little extension to a very simple activity.


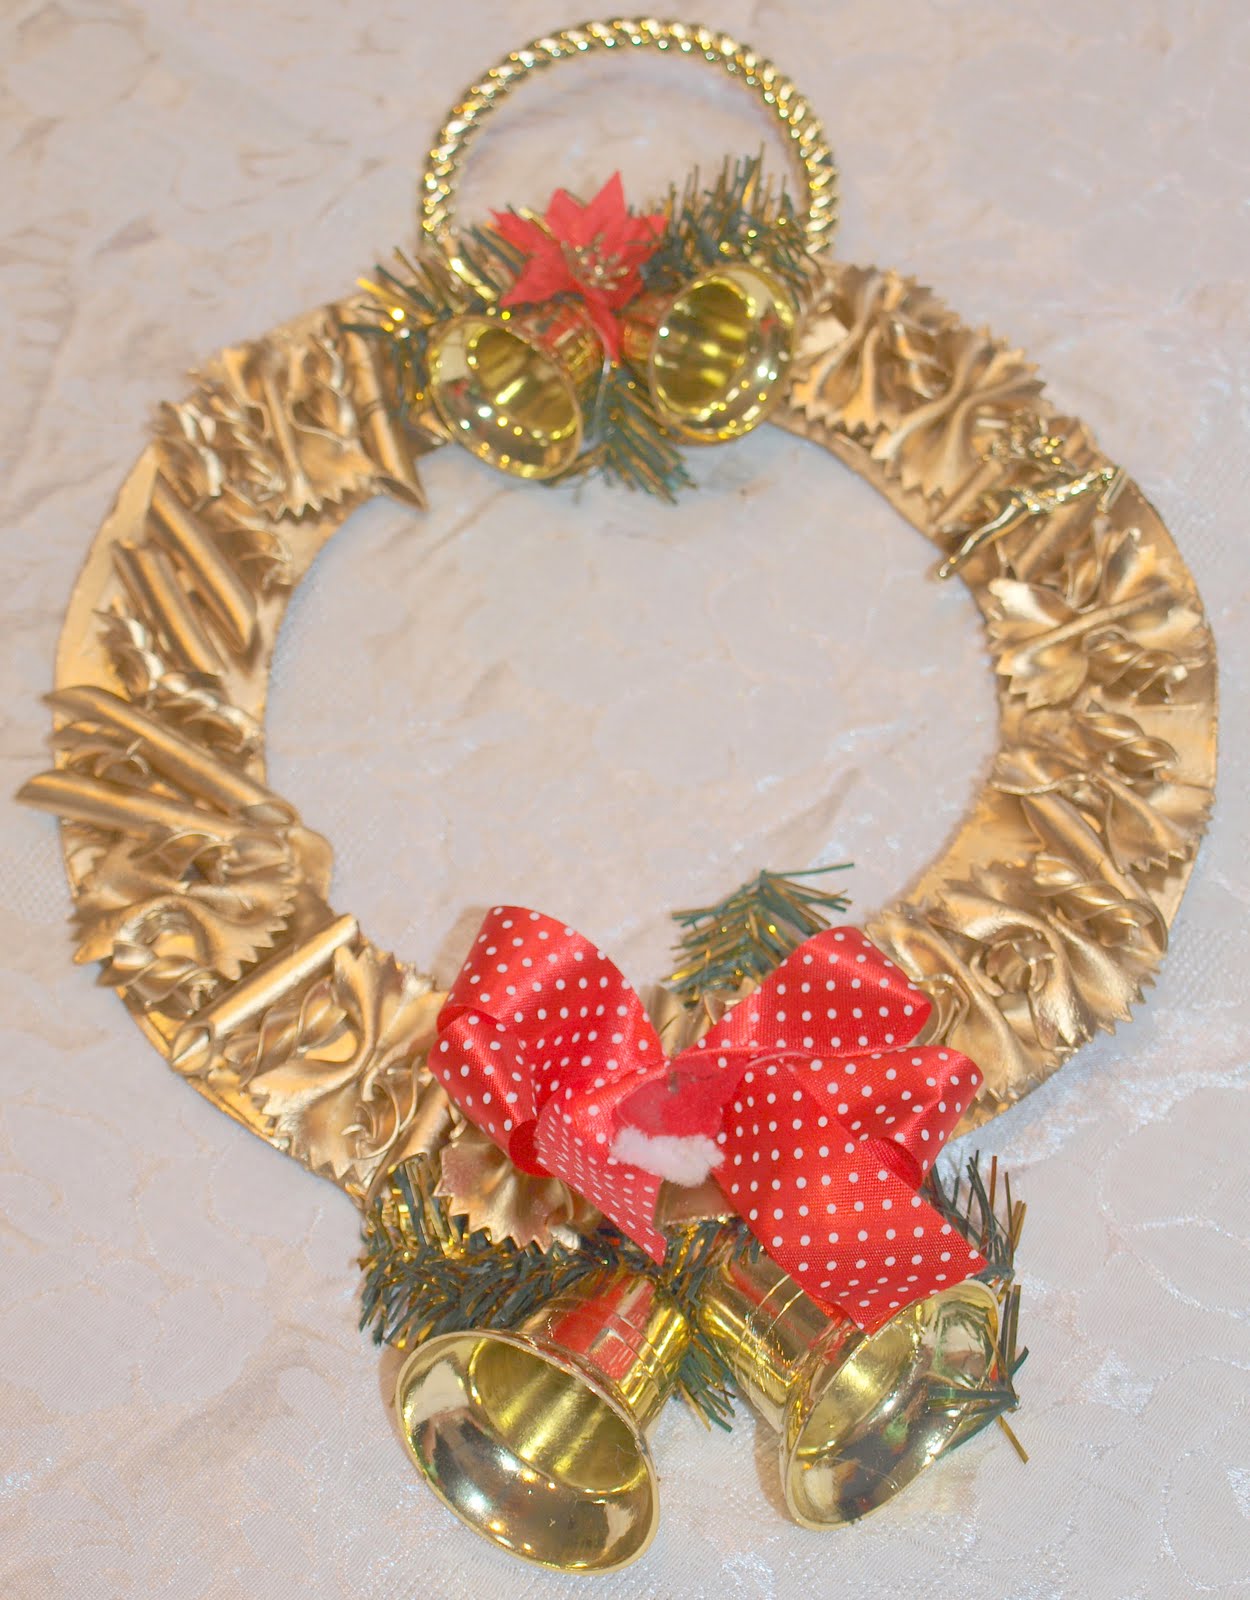
Then we moved on to creating Christmas Wreaths.


Materials:

Used Cereal Boxes
Pencil
Plates, Bowls for tracing around
PVA Glue
Pasta Shapes
Spray Paint (christmas colours)
Old Decorations
Hot Glue Gun (handy but not essential)

For this I used old cereal boxes. The cardboard is a little flimsy though and I was concerned that it wouldn't take the weight, so I stapled two pieces together. If you do this one, I'd even recommend stapling 3 pieces just to make it extra strong.

I used a plate and bowl to draw the template on and set about cutting all of the pieces.


I layed out a few different containers of pasta shapes to choose from. Bows, Penne and Spirals. The kids set about gluing the shapes on in any design they chose. I just suggested that they cover as much of the cardboard ring as possible.


The wreaths were left to dry over night. Whilst we went to the hardware to purchase our cans of spray paint. We chose gold and silver.


The next day we took the wreaths outside to spray. Both B and K chose to use the gold paint. This part was priceless, truly it was. You know when you purchase a can of spray paint the lid is generally the colour of the paint. In this instance the gold and silver were pretty bland looking and I knew that they weren't that impressed with the colours.

As soon as the first spray of paint hit their wreaths you could see the smiles and their eyes light up. They really just could not believe how incredibly shiny it was. Such a simple experience but it was one that we'll remember and talk about for awhile to come.


B finishing off with the spray can. K found the nozzle a little tricky to use. They only took about 10 minutes to dry outside and already they looked fabulous. Whilst they were drying we went in to go through the stash of old decoarations. The kids found the pieces they wanted to use to adorn their wreaths.

We attached everything with a hot glue gun. One important point here, you really do get what you pay for when it comes to these things. I bought ours on clearance for next to nothing and it is a piece of rubbish.


This is B's finised Wreath


And K's finished Wreath. We have already had comments from family members that have seen them as to how lovely they are and did the kids really make these?! These were oh so simple and they truly look stunning.

Next it was time for some very Glittery Tree Decorations (these were a kit but you could easily do this yourself)

Materials

Cardboard cut into Christmas Shapes
Glue
Glitter
Other Christmas items to decorate


The kit included Trees, Presents, Stars, Snowflakes and Rudolph.


A splattering of things to decorate with will definitely help. Be prepared for glitter everywhere and I mean everywhere.


Add some glue and start decorating.


Leave to dry overnight.


The finished decorations waiting to be hung on the tree. They just need a piece of string or something tied to the top for hanging purposes.


K enjoyed these structured crafts but letting her loose on the supplies is oh so much fun. This is where she is really in her element. She created this collage from left over (old) decorations and glitter.

Well we had a great first week of Christmas Craft. I'm trying to not do too much all at once for fear of the kids losing interest and for us running out of supplies......now what shall we make this week????? Time to go back through the box.


What Christmas Fun did you get up to this week?

Related Posts with Thumbnails
 

Blog Design by: Relevant Designs